Showing posts with label cooking. Show all posts

Friday, 2 July 2010

Kanelbullar (Cinnamon Bun) Recipe


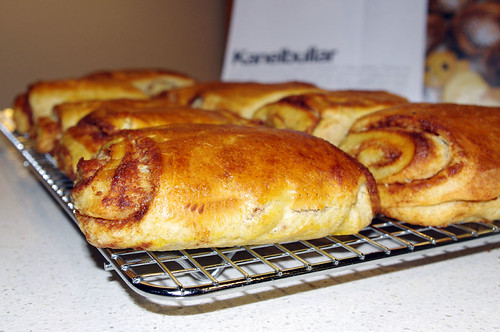
The buns, just out of the oven - they're a bit wonky and are without pearl sugar, but taste pretty good.

Well, I've now had two attempts at making Kanelbullar (Cinnamon Buns) and although I'm certainly no expert, I'm getting a bit better at making them. Tweaking is part of the fun of cooking for me and I think by attempt #3, I might just be there. And hopefully by then I'll have found some pearl sugar, which is a vital visual element for these buns but not so easy to come by in Melbourne town.

Rolling out the pastry

My recipe comes from the book "Swedish Culinary Classics" by Carl Jan Granqvist & Lena Katarina Swanberg, released by The Swedish Institute. Here's the spiel that comes with their recipe:

Kanelbullar are a classic at Swedish coffee parties. During the golden age of home baking, such parties turned into orgies of sweet yeast breads, small cookies, cookies with fillings, pastries and cakes. This tradition lives on in Sweden. If you are invited to someone's home for coffee, you always get a cinnamon bun, a cookie or a piece of cake with it. And at cafes, dainty little cookies continue to compete with all those supersized American muffins.

Kanelbullar (Cinnamon Bun) Recipe

INGREDIENTS
Makes 25 buns
35g yeast
100g sugar
300ml milk
1 egg
120g butter
1tsp salt
1 tbsp ground cardamon
750g wheat flour

Filling
100g butter
50g sugar
2 tbsp cinnamon

Glaze
1 egg
2 tbsp water
pearl sugar

PREPARATION
Crumble the yeast in a bowl and stir in a few tablespoons of milk. Melt the butter and pour the milk on it. Add the rest of the ingredients and kneed the dough in a dough mixer for 10-15 minutes. Let the dough rise while covered at room temperature for 30 minutes.

Roll out the dough so it is about 3mm thick and 30cm wide. Spread the room temperature buter on top. Make a mixture of sugar and cinnamon and sprinkle it over the dough. Roll the dough the long way and cut the roll into about 25 slices. Place them with the cut edge upwards in paper moulds. Place on a baking sheet and let rise under a towel for about 60 minutes or until the buns have doubled in size.

Beat together the egg and water, brush the mixture carefully on the buns and sprinkle pearl sugar on top. Bake in the oven at 220 degrees celsius for 5-6 minutes. Allow to cool on a rack.

MY NOTES:
  • I used dry yeast, so I halved the amount listed above. Next time I'm going to try fresh yeast, which you can buy from bakeries.
  • You don't need a bread machine/dough mixer but it makes it a bit easier.
  • I made bigger buns this time so only got about half the number, but they turned out less dry than my first batch of 25. When they rise they get pretty big, but if you pat them down a bit the size is more manageable. If you make them bigger like me, you'll need to adjust the cooking time - up to double the time in the recipe.
  • I also laid them out a bit differently - the swirl wasn't facing up but to the side, just for something different.
If you've got any tips/tricks on making these buns, I'd love to know!

Thursday, 1 July 2010

Warms wrists, Swedish style

Look what arrived in the mail yesterday...

Photograph © Sandra Juto

..some lovely Wrist Worms made from a soft charcoal merino wool, all the way from Sweden. To die for! Jed got a grey pair too, so we're almost matching, and are very pleased to have very very warm wrists. Thanks Sandra :)

OK, off the finish cinnamon buns batch #2, I'll let you know how they go.

Friday, 10 October 2008

Fully Framed

You can almost barely see it, but below is a Julia Rothman print that I finally got framed (over a year after I bought it!) It's a screenprint of one of her illustrations, called Luxury Aparments. The tube it travelled to Australia in got semi-crushed - bad but not that bad that I wanted to replace it - and I think this is why I was a bit lacking in enthusiasm about the whole thing. But now it's up on the wall I love it. And there might just be some left in Julia's shop, under the handmade section.


Friday afternoon walk.
I walk past this all the time, but never noticed how amazing it is.


Last night's dinner.
Forgot to take a photo of the frittata this turned into.

Wednesday, 23 April 2008

Potting and poaching

OK, so the reason I starting this blog in the first place was to kinda document the sewing/printing I was doing, so I didn't forget it all. I don't seem to have done any of that for ages and ages (or not much, anyway) - I wonder if that's because I spend too much time doing other things, like poaching delicious seasonal fruit (this time: helllo quinces) and working on my new-found love of pottery. Hmm.

Saturday, 22 March 2008

Relish is delish

OK, so after quite a bit of preparation the night before (cutting 8kg of tomatoes and nearly 3kg of onions into little bits!) I thought yesterday's main activity of relish-making would be a breeze - just cook the stuff, bottle it and be done. Of course it took way longer than expected (9am to 6 or 7pm, I think it was) but I reckon it was worth the effort - it is tasty and will last at least a year (and make a nice gift).

Here's how the day progressed:


Note the Keen's Mustard container - it gives an idea of how big this container is!


That's a lot of jars, and I used all but one of them.


All done!

And while it was bubbling away I tried my hand at some hot cross buns (half currant, half chocolate for Mr. I Don't Eat Dried Fruit). They're from the Delia recipe, as recommended by Loobylu - think I printed the recipe when she made them two years ago but only got around to making them now but it was worth the wait.

Thursday, 28 February 2008

Sugo mania

Yesterday a friend and I decided to go the CERES organic market in East Brunswick (a place I haven't visited in aaages) to pick up some lovely locally grown produce. There we stumbled across a few 10kg boxes of their own tomatoes and seeing them was really all we needed - within a few hours (OK, quite a few hours as also had to get coffee, have lunch etc etc) we had bottled our own tomato sauce, ready for whipping up quick pasta dinners.


And there are more snaps on Flickr.

The recipe is a trusty one, given
to my friend's boyfriend by an old Italian, and I've done my best to remember it here! Oh, and we used a mouli to separate the seeds and onion from the sauce, although I'm sure there are other things you could use (a sieve might be hard but might do the job...)

Fresh Tomato Sauce

Box of tomatoes (we had 10kg!)
3-4 onions, diced
4 cloves garlic, crushed
A few dashes of olive oil
Salt, pepper to taste
Fresh basil leaves

1. Quarter tomatoes and toss into a big saucepan (you may need to do this in batches - we did our 10kg in 5 batches) and splash in some water. Simmer on stover for about 15 minutes until the tomatoes have collapsed.

2. Strain in sieve to remove excess liquid (which you can keep for a soup stock or other tomato-ish stock).

3. Put back in saucepan and add onion and garlic (our 10kg reduced enough so that we now had two big saucepans half full) and simmer for a further 15 minutes or until onion and garlic have softened and cooked.

4. Cool for a little bit then process through a mouli to separate the sauce from the tomato seeds and onion; discard seeds and onion and bottle your sauce! Top each bottle with a basil leaf.

I think it'll keep a while as we bottled ours in jars that were 'sterilised'. OK, so technically they might not be sterile, but close enough - we washed and cleaned them in soapy water, then left in the oven on 160 degrees celcius for 3o mins or so.

**UPDATE** It's probably a good idea to either use proper preserving jars (with tight rubber seals) OR store in fridge OR just put in plastic containers and freeze, else your sauce may not last long on the bookshelf :(


And on a completely different note, above is a print I bought from Ashley G (aka Kitty Genius) via her Etsy shop ages back, that I only just got around to framing. It's printed on archival matte poly/cotton canvas (lovely texture, almost like fabric) and the frame is white, of the box variety. So cute!

Tuesday, 5 February 2008

Shrove Breakfast


Any excuse to have pancakes is good, but today is the best - mmm, Shrove Tuesday (actually, these are almost crepes). Although they're a bit wonky (hey, homemade is cool) they tasted pretty good and went well with a homemade warm blueberry sauce (with berries we picked ourselves).

PANCAKES

Ingredients:
1 cup flour
1/4 teaspoon salt
1 egg, beaten
1 1/2 cups milk

Method:
1. Sift flour & salt and make a well in centre
2. Place egg in well and with a wooden spoon gradually work in the flour and half the milk.
3. Beat for 1 min and stir in remainder of milk
4. Allow to stand for 1/2 hour (to soften the cellulose of the starch grains, producing a lighter batter)
5. Melt a bit of butter in fry pan. Pour sufficient mixture to cover pan (or to make pancake to the size you want). Cook until set and lightly browned on base
6. Turn pancake and brown on other side, then remove from pan. Keep on a plate in oven set to low temp (about 100 degrees celsius) while you cook the rest of the batter
7. Serve with lemon juice and sugar, warm blueberry sauce, maple syrup, ice-cream or whatever else you feel like!

(Recipe from the trusty Cookery the Australian Way)

Related Posts Plugin for WordPress, Blogger...